Category Archives: How To

How to Upgrade Cumulus Linux on N-Series Switches?

In the previous posts, we have introduced lots of details about Cumulus Linux, a network operating system. Also, we have talked about how to install Cumulus Linux on FS N-series switches like the 100GbE switch. In this post, we will solve another Cumulus Linux related question concerned by most of our users: how to upgrade Cumulus Linux on an N-series network switch?

Before Upgrading Cumulus Linux

Before any update, you should consider the migration and backup of some important data or files in case of any accident or emergency. In that way, being clear about the location of your configuration data is crucial before updating Cumulus Linux. Just like other Linux operating system distributions, the /etc directory is the primary location for all configuration data in Cumulus Linux. In the following figures, we list some files and as well as their directories that you are likely to do the backup.

Cumulus Linux Network Configuration Files

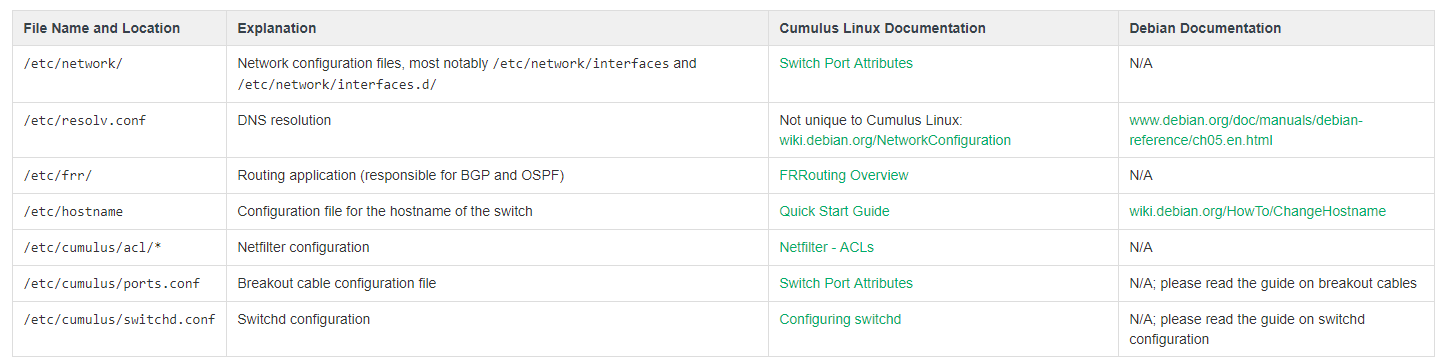
Figure 1: Cumulus Linux Network Configuration Files

Additional Commonly Used Files

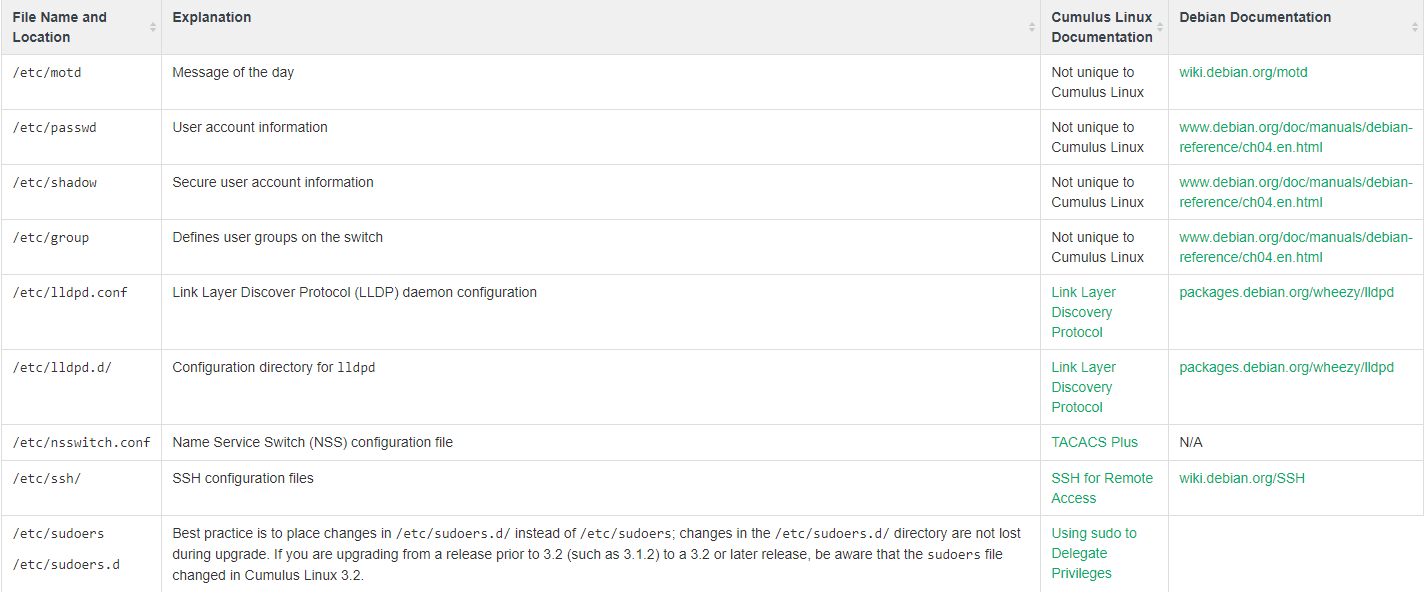
Figure 2: Additional Commonly Used Files

Note: If you are using the root user account, consider including /root/. If you have custom user accounts, consider including /home//.

Upgrading Processes

Basically, there are two methods to upgrade Cumulus Linux: disk image install and package upgrade. According to different environment and preferences, the upgrade can be achieved in different ways. In this part, we will guide you on how to use these two ways one by one. By the way, if you are using MLAG to dual connect two switches in your environment, there are additional steps to follow. You can refer to the guide:Upgrade Switches in an MLAG Pair.

Solution 1: Installing A Disk Image

When you are performing a rolling upgrade in a production environment and using up-to-date and comprehensive automation scripts, the disk image installation will be recommended. It enables you to choose the exact release to which you want to upgrade. Moreover, it is the only method available to upgrade your switch like a 10GbE switch to a new release train (for example, from 2.5.6 to 3.7.0) or from a release earlier than 3.6.2.
To apply this upgrade, you need to use ONIE (open network install environment), which allows the installation of network operating systems (NOS) on a bare metal switch. FS N-series switches all include an ONIE installer. There are mainly six steps you can follow with:

1. Back up the configurations off the switch.

2. Download the Cumulus Linux image you want to install.

3. Install the disk image with the onie-install -a -i command, which boots the switch into ONIE. There are various ways to install the disk image, such as using FTP, a local file, or a USB drive. In figure 3, we demonstrate how to install image from a web server as your reference. After disk image installed, the switch can be rebooted.

Disk Image Install

Figure 3: Disk Image Install

4. Restore the configuration files to the new release—ideally with automation.

5. Verify correct operation with the old configurations on the new release.

6. Re-install third-party applications and associated configurations.

Solution 2: Upgrading Packages

Package upgrade is recommended if you are upgrading from Cumulus Linux 3.6.2 or later, or if you use third-party applications (package upgrade does not replace or remove third-party applications, unlike disk image install). When upgrading, configuration data stays in place. If the new release updates a configuration file that you changed previously, you are prompted for the version you want to use or if you want to evaluate the differences. Altogether, there are six steps as follows:

1. Back up the configurations from the switch.

2. Apply the following command to fetch the latest update metadata from the repository.

Command for the Latest Update Metadata

3. Review potential upgrade issues (in some cases, upgrading new packages might also upgrade additional existing packages due to dependencies). Run the following command to see the additional packages that will be installed or upgraded.

Command for Additional Packages

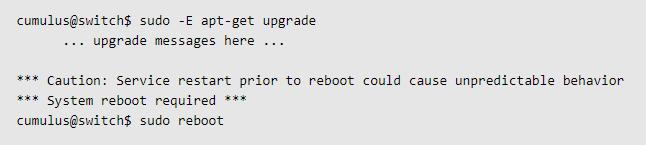
4. Upgrade all the packages to the latest distribution.

Command to the Latest Distribution

5. Reboot the switch if the upgrade messages indicate that a system restart is required.

Command to Reboot the Switch

6. Verify correct operation with the old configurations on the new version.

Questions & Answers

Besides the procedures to upgrade Cumulus Linux, we also list some questions concerned most by our FS customers.

1. How to Deal With Upgrade Failures?

Even the most well planned and tested upgrades can result in unforeseen problems. If you fail to upgrade Cumulus Linux, sometimes the best solution is to roll back to the previous state. You can refer to the following three techniques:

  • Back out individual packages: If you identify the problematic package, you can downgrade the affected package directly. In rare cases, you might need to restore the configuration files from backup or edit to back out any changes made automatically by the upgrade package.
  • Flatten and rebuild: use orchestration tools to re-install the previous OS release from scratch and then rebuild the configuration automatically.
  • Backup and restore: restore to a previous state, using a backup captured before the upgrade.
2. Will Future Software Updates for Cumulus Linux Be Free?

For FS N-series switches, the default validity of Cumulus Linux is one year. If Cumulus Linux OS is upgraded after 1 year, the customer can’t upgrade it for free and needs to renew the software support. Even if the software support service has been expired, you are allowed to use your current software as usual. By the way, we also provide a three-year software support fee option and a five-year software support fee option. The longer for OS support you choose, the more economical the switch will be.

3. Who Will Cover Technical Support?

FS will provide five-year tech support for the hardware. As for the problems about Cumulus Linux, FS and Cumulus will solve it together. Moreover, as one of the Linux distributions, the source code of Cumulus Linux is also freely available to everyone to use, modify or share such as GitHub. Just like the above question about the software update, the default validity of technical support for Cumulus Linux is one year. One year later, you can renew the support term.

Summary

In this post, we mainly focus on how to upgrade the Cumulus Linux on FS N-series switches. In addition, we list three after-sales related questions frequently asked by our FS customers.

What Cable Should I Use for 10G Transceiver Module?

To deploy the optical network, the transceiver module and patch cable are the two basic components. According to the feedbacks of customers from FS.COM, one of the common problems faced by them is what cables they should use for their transceiver modules. To solve this problem, we make this post of patch cable selection guidance. Since the order for 10G transceivers ranks top, we are going to take 10G modules as a reference.

An Overview of 10G Transceiver Module

Transceiver module, also called fiber optic transceiver, is a hot-pluggable device that can both transmit and receive data. By combining a transmitter and receiver into a single module, the device converts electrical signals into optical signals to allow these signals to be efficiently transferred on fiber optic cables. As for the 10G transceiver, it refers to the optical modules with 10G data rate. In FS.COM, there are mainly four types of 10G transceivers: XENPAK, X2, XFP, and SFP+. Even though these optical transceivers are all accessible to the 10G networks, they have different matching patch cables and applications.

10G Transceiver Module

Figure 1: 10G Transceiver Modules

Patch Cable Basics

Apart from optical module, the patch cable is the other vital role in networking. Patch cable, also called patch cord, refers to the copper or optical cable. It’s designed to connect one electronic or optical device to another for signal routing. Conventionally, the patch cable will be terminated with connectors at both ends. For example, the LC fiber cable refers to the optical cable fixed with LC connector. Typically, there are LC, SC, ST, FC and MTP/MPO fiber patch cables. According to different features, we can get various classifications of patch cables, such as fiber types, polishing types, etc.

Patch Cables

Figure 2: Patch Cables

Factors to Consider When Choosing Patch Cable for 10G Transceiver Module

Recently, most of the 10G transceiver modules are compatible with different brands and support higher data rates. It will be much easier to choose optical modules for your networking than selecting mating patch cables. Based on most applications, there are three major factors that can be taken into consideration: transmission media, transmission distance, and transceiver module interface.

Transmission Media

Classified by transmission media, two types of patch cables can be found in the market: optic fiber cable and copper cable. Correspondingly, there are two kinds of optical transceivers available: copper-based transceivers and fiber optic based transceivers. Copper transceiver modules like 10GBASE-T SFP+, they have an RJ45 interface, connecting with copper cables. Typically, Ethernet cables that support 10G copper-based transceivers are Cat7 and Cat6a cables.

As for the 10G optical modules, they can support higher data rates over optic fiber cables. It will be more complicated to choose fiber cables. Generally, there are multimode fibers and single mode fibers. Based on the specified needs for transmission distance, the answer will be varied.

Transmission Distance

To select cables, the transmission distance is also an important factor that you need to take care. In the following table, we list the basic information of common 10G transceivers, including their supporting fiber cable types and transmitting distance.

Transceiver Type
Wavelength
Cable Type
Transmission Distance
SR
850 nm
MMF
300 m
LR
1310 nm
SMF
10 km
ER
1550 nm
SMF
40 km
ZR
1550 nm
SMF
80 km

As for fiber cables, single mode fiber is used for long-distance transmission and multimode fiber is for short distance. In a 10G network, the transmission distance of single mode fiber (OS2) can reach from 2 km to 100 km. When it comes to multimode fibers, the transmission distances for OM1, OM2, OM3 are 36 m, 86 m and 300 m. OM4 and OM5 can reach up to 550 m.

Transceiver Module Interface

Another factor you need to consider is the transceiver interface. Usually, transceivers use one port for transmitting and the other port for receiving. They tend to employ duplex SC or LC interface. However, for 10G BiDi transceivers, it only has one port for both transmitting and receiving. Simplex patch cord is applied to connect the 10G BiDi transceiver.

Summary

For your 10G network cabling, transceiver module and patch cable are necessary components. With a wide range of patch cables, selecting the right patch cables will be more complex than 10G transceivers. Generally, three major factors can be considered: transmission media, transmission distance, and transceiver module interface. To apply what you have learned in this post in cabling, you can visit FS.COM for all the transceivers and patch cables at one shop.

How to Troubleshoot Transceiver and Switch Port Through Loopback Test?

Loopback

Loopback is a commonly used term in telecommunications. It refers to the process of transmitting electronic signals or digital data streams and returning to their sending point without any intentional processing or modification. Therefore, by comparing transmitting signals with the receiving signals, the loopback test is used to debug physical connection problems. But what a loopback test means for fiber optic network and how to make use of it will be the issues that we will explore in this post.

Why Need Fiber Loopback Test?

To conduct a fiber loopback test, the communication devices will be involved, like the transceivers and the switch. As you know, the transceiver is the basic component of fiber optic communication network equipment. We can take the transceiver as a case. Conventionally, a transceiver has a transmitting port and a receiving port, in that way, the loopback test can be applied to test the ports to diagnose whether the transceiver is working well and the configuration of the switch is right. For its unique working mode, the test is a convenient way to maintain transceivers. In the next part, we will deliver how to do the fiber loopback test on the transceiver.

How to Conduct Loopback Test?

In this part, we will introduce two types of tests to troubleshoot transceiver and switch port: single-port test and dual-port test.

Tools You Need to Prepare

To perform tests, things you need to prepare are listed below:

  • Transceivers (2pcs), such as 10G SFP+ SR transceiver.
  • Simplex fiber cable (1 pc).
  • Switch (1 pc), like Cisco switch.
  • Duplex fiber cable (1 pc).
  • Two loopback cables (optional), like LC or SC loopback cable. To know more about loopback cable, you can move to the article: What Is Loopback Cable And How to Use It?
Loopback Cable

Figure 1: Loopback Cable

Loopback Test Steps
Single-port Loopback Test

Figure 2: Single-port Loopback Test

1. Connect your transceiver with one simplex fiber cable or loopback cable, such as LC fiber cable or LC loopback cable. At this step, you can examine whether the port and transceiver parameters are normal.

2. Check the software version of the switch.

3. Review the interfaces status to confirm the working status of all ports on the switch.

Display the Working Status of All Ports

Figure 3: Display the Working Status of All Ports

4. Check the working status of the port you are connecting, such as the port 50 in the following figure.

Working Status of Interface 50

Figure 4: Working Status of Interface 50

5. Go over the DDM information to review whether the transceiver works in normal status.

DDM Information of Port 50

Figure 5: DDM Information of Port 50

Dual-port Loopback Test

Figure 6: Dual-port Loopback Test

1. Connect two transceivers with one duplex fiber cable or two loopback cables. At this step, you can examine whether the port and transceiver data rate are matching as well as the link is normal or not.

2. Check the interfaces status to confirm the working status of all ports on the switch.

Ports Working Status Display

Figure 7: Ports Working Status Display

3. Check the working status of the two ports you are connecting, such as the ports 50 and 52 in the following figure.

Working Status of Interfaces 50 and 52

Figure 8: Working Status of Interfaces 50 and 52

4. Go over the DDM information to review whether the transceiver works in normal status.

DDM Information of Ports 50 and 52

Figure 9: DDM Information of Ports 50 and 52

Summary

To troubleshoot the circuit connectivity as well as the transceiver and the switch port, loopback test is a cost-effective way. In this post, we have an overview of loopback and make a demonstration of how to conduct the loopback test on a switch to debug the transceiver and the switch port.

48 Port 10GB Switch Selection: What Is the Right Choice?

The advent of big data, virtualization and cloud computing are pushing higher speed network adoption. As such, data center networks are going through a profound change – in which 40GE has become ubiquitous and 10GE a must. Network managers have reaped great benefits by deploying 10G Ethernet switch at the edge of the large professional network, which makes 10G SFP+ switch a choice for speed and productivity. In the midst of various 10G Ethernet switch, a 48-port 10Gb switch is considered as an optimal solution for handling data traffic that delivers great scalability. Then how to choose the right 48 port 10gb switch? We’re going to explore it in this article.

Why Do I Need a 48 Port 10GB Switch?

10G Ethernet switch is a cost-effective solution compared to multiple Gigabit Ethernet ports, while delivers substantially better throughput and latency. It is already well established in IT industry and we’ve seen massive adoption of 10G infrastructure. Density, power and cooling of 10G SFP+ switch are key motivators for deployment of data center network. With compelling improvement in bandwidth, port density, latency and power consumption. 10G SFP+ switch has become the interconnect of choice for latency sensitive application with enhanced reliability and network performance. 10G Ethernet switch comes into various port configuration, and a 10gb 48 port switch is the most future-proofing one with abundant application in business oriented network. It increases the total available bandwidth, the reduced power consumption in cables and switch ports, and overall reduction in infrastructure costs.

48 port 10gb switch

Common 48 Port 10GB Switch Comparison

As the need for 48 port 10 GbE switch spurring, vendors also compete to offer 10G Ethernet switch with advanced function and decreased cost. Here we compare some commonly seen 48-port 10GbE switch along with FS.COM N5850-48S6Q 48 port 10GbE switch, including parameters about their port combination, switching capacity, latency, power consumption and  10Gb switch 48 port price.

Model
Edge-core AS5712-54X
Cisco WS-C3850-48XS-S
Dell Networking S4048-ON
HPE 5900AF (JC772A)
N5850-48S6Q
SFP+ Ports
48
48
48
48
48
QSFP+ Ports
6
4
6
4
6
Switch Class
L2 and L3
L3
L2 and L3
L3
L3
Switching Capacity
720 Gbps
1280 Gbps
1.44Tbps full-duplex
1280 Gbps
1.44Tbps full-duplex
Latency
720 ns
600ns
680 ns
Max Power Drew
282 W
234.35 W
260 W
200W
Forwarding Rate
1 Bpps
909 Mpps
1080 Mpps
1 Bpps
Price
$5,095.00
$7,970 00
$7,475.96
$9522.52
$4,419.00

When selecting a 10G SFP+ switch, it all comes down to two things: application and budget. Your application of the 48-port 10GE switch partially determines several factors, such as port configuration, switching capacity, power consumption and switch class. The port configuration and speed are relative to switching capacity. So you have to consider the amount of traffic to run through this 48-port 10GE switch and select one that can accommodate all the data flow. Power consumption on the other hand is also very essential as it defines the operating cost in the long run, a power efficient switch can save you a great amount of money. All the 10G Ethernet switch in the table have very similar port combination and they are all L2/L3 switches. As for these 48-port 10Gb switch price, N5850-48S6Q has unsurpassed benefits over the others.

Deep Dive into FS.COM 48 Port 10GB Switch N5850-48S6Q

This 48 port 10GE switch N5850-48S6Q is a 10G SDN switch, which is designed to meet the high-performance, availability, and network-scaling requirements of enterprise and cloud data centers. It provides full line-rate switching at Layer 2 or Layer 3 across 48 x 10GbE ports and 6 x 40GbE uplinks, delivering 1.44Tbps switching capacity for the most demanding applications. This 48 port 10GE switch can be used either as a Top-of-Rack switch, or as part of a 10GbE or 40GbE spine-leaf fabirc. All ports support full L2/L3 features, IPv4/IPv6 and OpenFlow for high scalability and Software-defined Network (SDN) for ease of operation. Besides, N5850-48S6Q 48 port 10GE switch delivers excellent low latency (680 ns) and power efficiency in a PHYless design. While support for advanced features, including MLAG, VxLAN, SFLOW, SNMP, MPLS etc, this 48 port 10G Ethernet switch is ideal for traditional or fully virtualized data center.

fs.com 48-port 10ge switch

Conclusion

48 port 10GB switch has made a great leap forward to satisfy the demand for increased network performance, reliability and scalability. The need for 10 Gigabit Ethernet spans all markets and business types, as technology marches forward, these 10G Ethernet switches will no doubt drop in cost and increase in capability. Equipped with higher level of hardware and software reliability design, FS.COM 48 port switch offers compelling reliability and scalability improvements. For more information, welcome to visit our site.

Related Article: How to Choose a Suitable 48-Port PoE Switch?

How to Realize 16 Channels Transmission in DWDM Network?

DWDM MUX/DEMUX plays a critical in WDM network building. 16 channels transmission is very common in DWDM networks. How to realize it in a simple way? This article intends to introduce two solutions to achieve 16 channels with different types of components. Which one is more cost-effective and competitive? The comparison between the them also will be explored. Hope it will help you when choosing fiber mux for your DWDM networks.

wdm network

Solutions to Achieve 16 Channels Transmission in DWDM Network

In order to illustrate the solution more clearly, I take two types of DWDM MUX/DEMUX as an example. One is the traditional 16 channels dual fiber DWDM MUX/DEMUX. Another is two FMU 8 channels dual fiber DWDM MUX/DEMUX. The latter has an expansion port.

Solution One: Using Traditional 16 Channels DWDM MUX/DEMUX

The 16 channel DWDM MUX/DEMUX is a passive optical multiplexer designed for metro access applications. It’s built fiber mux and demux in one unit and can multiplex 16 channels on a fiber pair. In addition, this type of fiber mux also can be added some functional ports like expansion port, monitor port and 1310nm port, which make it possible to increase network capacity easily. The following is a simple graph showing the 16 channels transmission with this traditional DWDM MUX/DEMUX.

16 channels dwdm mux demux

Solution Two: Using Two FMU 8 Channels DWDM MUX/DEMUX Modules

The FMU 8 channels DWDM MUX/DEMUX provide 8 bidirectional channels on a dual strand of fiber. Usually they are used together. Unlike the 16 channels DWDM MUX/DEMUX, this FMU 8 channels one has a more compact size, for it only occupies half space in a 1U rack. Put two FMU 8 channels DWDM MUX/DEMUX modules into one 1U two-slot rack mount chassis. two 8 channels DWDM MUX/DEMUX with different wavelengths are connected through the expansion port to realize 16 channels transmission in a DWDM network. Here is a graph showing how to achieve 16 channels DWDM transmission with these two 8m channels fiber muxes. As shown in the figure, two 8 channels DWDM MUX/DEMUX with different wavelengths are connected through the expansion port to realize 16 channels transmission in a DWDM network.

8 channels

16CH DWDM MUX and Two FMU 8CH DWDM MUX: What’s the Difference When Deployed?

From the content above, we can see both solutions can realize the 16 channels transmission in a DWDM network. Then, are there differences between them? Or which is more competitive? Here is a simple analysis of the two solutions.

fiber mux

Firstly, comparing the two graphs above, the FMU 8 channels DWDM MUX/DEMUX are connected together by an expansion port, that’s why it can deliver 16 channels services like the traditional one. Except for connecting 8 channels DWDM MUX/DEMUX, the FMU fiber mux with expansion port also can be combined with other channels fiber mux like 2 channels, 4 channels or other channels, which offer more flexibility for optical network deployment and upgrade. And you can add DWDM into CWDM networks at some specific wavelengths with FS.COM FMU fiber mux.

Secondly, DWDM MUX/DEMUX price is always an important point that many network operators pay attention to. Therefore, when buying a fiber mux, the cost is a critical point to consider. If you search on Google, you will find the lowest price is $1100 in FS.COM. And the cost of using two 8 channels MUX/DEMUX is the same as the deployment of one 16 channels MUX/DEMUX. However, compared with the 16 channels DWDM MUX/DEMUX, the FMU 8 channels fiber mux provides a competitive solution for small networks which needn’t to buy a full-channel fiber mux that supports all 16 channels or more channels.

Conclusion

From the comparison above, the FMU 8 channels DWDM MUX/DEMUX is more flexible and cost-effective when deployed in WDM networks. How to choose is based on the requirements of your networks. FS.COM supplies two different types of these WDM MUX/DEMUX. Here is a simple datasheet of them. If you have more requirements for additional wavelengths, welcome to visit www.fs.com for more detailed information.

Application
ID
Description
16 channels
16 ch. DWDM Mux Demux, C27-C42, , IL <4.6dB, duplex LC/UPC
8 channels
8 ch. Dual Fiber DWDM Mux Demux, C53-C60, with expansion port, IL <4.6dB, LC/UPC